Introduction
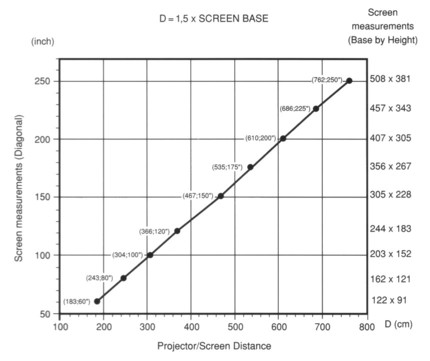
Projection size and room planningUnlike LCD & DLP projectors that often have a zoom lens feature, the Seleco SVT-180 has a fixed focal length. This means that the size of the projected picture is in exact proportion to the distance of the projector from the screen. To be more precise the front of the projector lens is always a distance that is 1.5 times the width of the screen from the screen. Or to put it in a more understandable way, the width of the picture is always 2/3 of the distance of the projector from the screen. The chart below is from the user manual:
This imposes some difficulties where your room is anything other than box shaped with a flat ceiling. If there is no ceiling area above the required location fro a given screen width, you either have to suspend the projector by some other means, set it up as floor standing or move some walls, & I'm not kidding! In rooms with a cathedral ceiling the best option in my opinion is to build a projector box into the rear wall of the cathedral and this is what I have done on a couple of occasions. Another option if you really have some space is to go for rear projection from another room. Make no mistake, if you are building a projection room, take these issues into consideration at the planning stage. Another option is to just put the projector where you want it and take whatever picture size comes! For example in a room 18 feet deep with the projector mounted in a recessed box at the back or the room (like a real theatre), you get a 12 foot wide picture! At a 4:3 aspect ratio that gives you over 100 square feet of picture and a diagonal of 180 inches. Still not even close to the 250 inch limit on this thing! Focus and Convergence
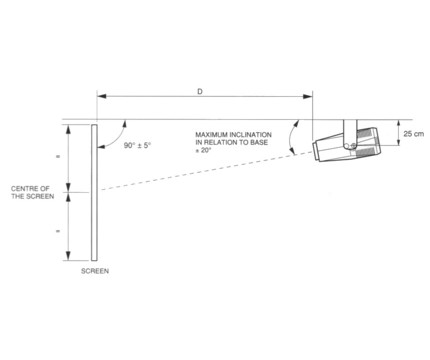
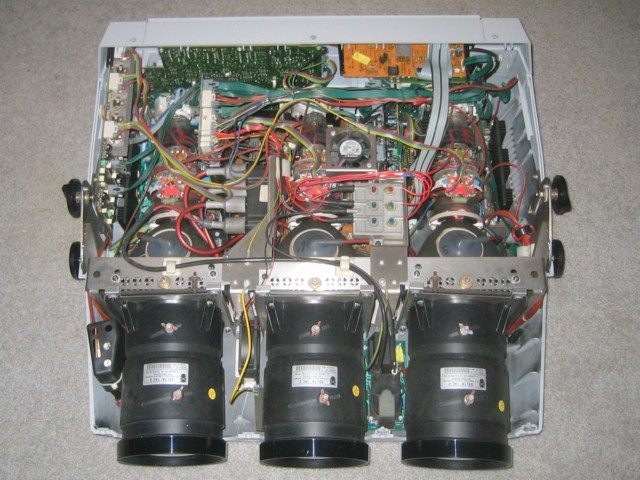
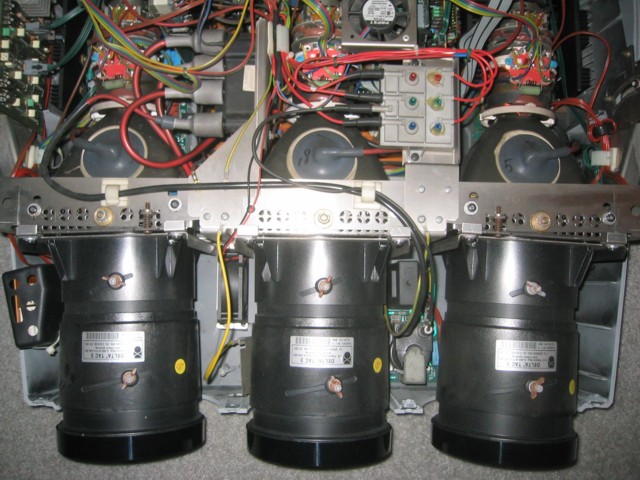
WARNING: Adjustment of the focus, alignment and video blanking require that the top cover of the projector be removed while the unit is operating and that tools like screwdrivers and wrenches (spanners for the English) be handled above the unit. Touching any of the internal HT components or dropping of any tools into the projector at this point could result in your death and or destruction of the projector! Are we understanding all about this now? Tube Focus & AlignmentThe first step is to align and focus each tube. In the Seleco user guide for the SVT-180 it merely says "Carry out mechanical convergence of the 2 tubes RED and BLUE on GREEN and obtain an accurate focusing of the picture on all three CRT, inserting one tube at a time, using the respective projection lenses to obtain the best focusing of the projected signal (grid) both in the central area and on its surrounding edges." Well that's completely clear right? So let me explain what this means and this procedure can be followed for any three tube projector: The green tube is fixed in the center of the projector in between red and blue pointing directly forward and with no horizontal alignment adjustment and so is the reference color. With the projector properly installed at right angles to the horizontal edge of the screen, green will be pointing directly at the center of the screen. Next, the red and blue tubes need to be adjusted so that they too point to the center. As the projector gets further from the screen, the tubes will be more inline with each other, but the red and blue will always lean it a bit as they are off center. Before any setup is done, any previous setting on the four video blanking adjusters (see below) must be reset to the widest unblanked setting and all the 51 convergence adjusters (see below) must be set to their center positions (especially 11, 12 & 32). This is so that the whole test grid can be seen roughly centered in each lens enabling proper setting of the two outer lenses to the central point.
First remove the top cover and power up the projector and let it sit for five minutes. Starting with the green tube, switch on green and the grid and remember to turn the brightness and contrast right down! Loosen the two focus wing nuts on the lens and set both sleeves to their central position. Adjust the rear sleeve so that the green focus is best in the center of the screen and lock the nut gently. Now adjust the front sleeve so that the focus is the best you can get it at the edges and lock the nut gently. Repeat this adjustment again with the two sleeves and then lock both nuts tight. The procedure is the same for the blue & red except for one additional first step after turning on the color and the grid: Loosen the center lock nut on top of the frame that supports the tube with a wrench (spanner for the English) and adjust the tube angle with a screwdriver using the spring adjuster screw towards the center on the top of the support rail. Adjust it so that the red (or blue) is pointing at the center of the screen also. Then lock the top lock nut tight with a wrench. Then continue with the focus of the other two tubes as described above. ConvergenceNow that the tubes are aligned and focused, it's time to adjust the convergence. When adjusting the convergence I can tell you there is no point in rushing. If you go onto the next step before properly finishing the current adjustment, you'll never be able to go back and successfully tweak a previous one, so take your time as you go and do not drink any beer until it is all done! At this point for the sake of safety I recommend to switch off the projector and replace the top cover as access to the video blanking controls will not be needed until later. There is no need to put the screws in. As you can see, the 51 adjusters are numbered 1 to 51. Now as they are not just randomly numbered from left to right you would think that this is an indication of the order in which they should be adjusted right? Well yes & no. The groups of controls do follow this ordering, first do the group containing 1, then the group containing 7 and so on. However the user manual suggests a different ordering for the adjustments within each group (except for the first). This may be because the procedure has been refined after the projectors were in production. The adjustments are made with a hex key (Allen key for the English) of 2mm in size. Seleco do provide a small round grey plastic adjuster for adjusting the small potentiometers (that I refer to just as pots) but using a proper key is easier and more precise.
Power up the projector and call up channel 00 (display will show PA2) and leave it running for 5 minutes. If you want to take a short break at any point (even for just a few seconds) turn off any tubes you have on until you are ready to continue! Master correctionsTurn on the green tube and the test pattern and adjust the pots in the group starting with 1 in the order 1, 2, 3, 4, 5, 6. With this group it is fine to go back and redo any that need to be redone as necessary to get the green grid as centered and parallel to itself as possible. Make sure you are happy with these adjustments before moving on to the next group. Green CorrectionsTurn on the green tube and the test pattern and adjust the pots in the group starting with 7 in the order 11, 10, 7, 8, 9. Again, with this group, it is fine to go back and redo any that need to be redone as necessary to get the green grid perfectly aligned, but I do not recommend going back to the group starting with 1. If you feel you need to do this, just start over. After this is done, the picture of the grid should be perfectly geometrically correct. All lines should be parallel to each other and the screen edges and the whole thing should be perfectly centered in the screen. Don't worry if some of the grid hangs over the edge of the screen, but the over hang on each side should be the same. This will be taken care of later. Make sure you are happy with these adjustments before moving on to the next group, after this green adjustment you can't go back! Correction of red with respect to green to make yellowTurn on the green tube, the red tube and the test pattern and adjust the pots in the group starting with 12 in the order 16, 15, 12, 17, 13, 14. The object here is to overlap red on green to make perfect yellow vertical lines. There should be no green or red to be seen hanging over the edge of the yellow vertical lines (except maybe in the corners, that comes later). Next, adjust the pots in the group starting with 18 in the order 21, 22, 18, 23, 19, 20. The object here is to overlap red on green to make perfect yellow horizontal lines like the yellow vertical lines. With the first two yellow groups, it is fine to go back and redo any that need to be redone as necessary to get the yellow lines of the grid perfectly aligned. Next adjust the corners of the yellow with the pots in the group starting with 24 in the order 24, 25, 28, 29, 26, 27, 30, 31. If you need to go back to any of the previous yellow adjustments, check all the corners again. Do not go back and mess around with the green! Make sure you are happy with these adjustments before moving on to the next group, after this yellow adjustment you can't go back! Correction of blue with respect to yellow to make whiteTurn on the green tube, the red tube, the blue tube and the test pattern and adjust the pots in the group starting with 32 in the order 36, 35, 32, 37, 33, 34. The object here is to overlap blue on yellow to make perfect white vertical lines. There should be no yellow or blue to be seen hanging over the edge of the white vertical lines (except maybe in the corners, that comes later). Next, adjust the pots in the group starting with 38 in the order 41, 42, 38, 43, 39, 40.. The object here is to overlap blue on yellow to make perfect white horizontal lines like the white vertical lines. With the first two white groups, it is fine to go back and redo any that need to be redone as necessary to get the white lines of the grid perfectly aligned. Next adjust the corners of the white with the pots in the group starting with 44 in the order 44, 45, 48, 49, 46, 47, 50, 51. If you need to go back to any of the previous yellow adjustments, check all the corners again. Do not go back and mess around with the green or yellow adjustments! Make sure you are happy with these adjustments before finishing, after this white adjustment you are done. If something is not right, you'll have to start over! Video Blanking
|
||||||||||||||||||||||||||||||||||||||||||||||||||||||||||||
 More than ten years ago now, I decided to setup a large front projection Home
Theatre style system at home. This was in the hay-day of
More than ten years ago now, I decided to setup a large front projection Home
Theatre style system at home. This was in the hay-day of


 One of the key points about a big three tube projector is that the focus and
convergence has to be setup on site for any given installation although Seleco
does ship it's projectors preset for use with a 100" screen with an 8 degree
inclination, so if that is what you had, you would have been lucky! In any
other installation, the whole thing has to be setup from scratch which can take
even a professional video engineer a few hours to do! This issue is one
of the key factors that makes the new generation of single chip DLP projectors
like the Sharp XV-Z9000U so desirable. Even LCD projectors have three
separate LCD panels for red green & blue inside that have to be perfectly
aligned at the factory although like the DLP, there is nothing to do in a home
installation, but even that factory convergence alignment can be challenging for
Sharp! Watch out for this issue also on some of the higher end 3 chip DLP
projectors. I have done this setup three times so far on the different
occasions that the projector has been moved and once done for a given
installation it should never need doing again. By luck, the last two
installations were the same with the projector being floor mounted on top of a
one or two story
One of the key points about a big three tube projector is that the focus and
convergence has to be setup on site for any given installation although Seleco
does ship it's projectors preset for use with a 100" screen with an 8 degree
inclination, so if that is what you had, you would have been lucky! In any
other installation, the whole thing has to be setup from scratch which can take
even a professional video engineer a few hours to do! This issue is one
of the key factors that makes the new generation of single chip DLP projectors
like the Sharp XV-Z9000U so desirable. Even LCD projectors have three
separate LCD panels for red green & blue inside that have to be perfectly
aligned at the factory although like the DLP, there is nothing to do in a home
installation, but even that factory convergence alignment can be challenging for
Sharp! Watch out for this issue also on some of the higher end 3 chip DLP
projectors. I have done this setup three times so far on the different
occasions that the projector has been moved and once done for a given
installation it should never need doing again. By luck, the last two
installations were the same with the projector being floor mounted on top of a
one or two story 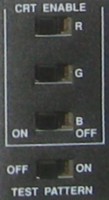 There are four switches on the back convergence panel.
Three of them activate each of the red blue and green tubes and
There are four switches on the back convergence panel.
Three of them activate each of the red blue and green tubes and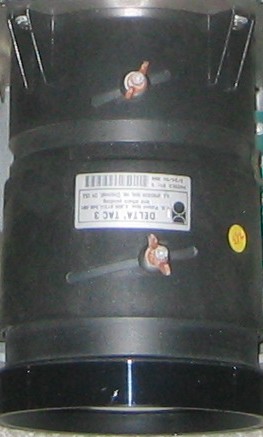 the fourth generates a test pattern or grid. This is so you can operate each
tube in turn and observe the mix of color from pairs of tubes and finally with
all three (white). WARNING: You must be aware that any prolonged
(more than a few seconds!!) operation at average brightness levels with the grid
displayed WILL burn lines into the tubes! To prevent this,
turn the brightness and contrast right down! Do the adjustments only in
total darkness and only turn up the brightness just enough to see the grid and
you'll be OK.
the fourth generates a test pattern or grid. This is so you can operate each
tube in turn and observe the mix of color from pairs of tubes and finally with
all three (white). WARNING: You must be aware that any prolonged
(more than a few seconds!!) operation at average brightness levels with the grid
displayed WILL burn lines into the tubes! To prevent this,
turn the brightness and contrast right down! Do the adjustments only in
total darkness and only turn up the brightness just enough to see the grid and
you'll be OK.


| Projection | |
| Type | Changeable forward or rear projection, ceiling or floor mount |
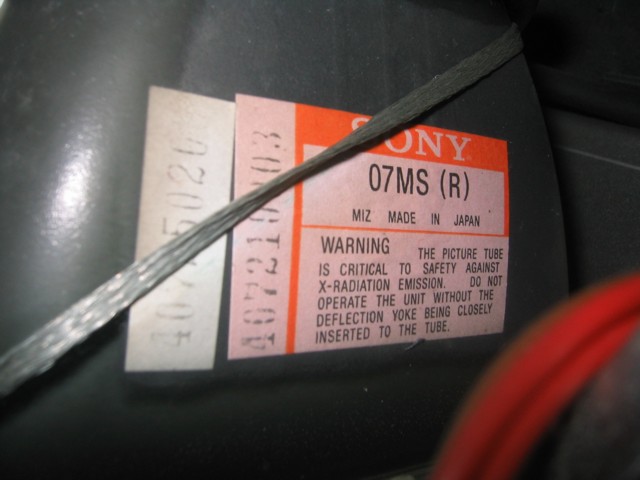
| Projection tubes | 3 high performance Sony 07MS CRT 5.5" 70o with liquid coolant lasting an average of 9000 hours |
| Lenses | 3 high resolution DELTA TAC 3 bifocal lenses, air cooled; chemically treated quartz glass |
| Brightness | 850 Lumens weighted at white peak |
| Video definition | Composit video: > 400 television lines S-VHS: > 450 television lines RGB: > 1000 television lines TTL: > 650 television lines |
| Projection Size | 60" to 250" diagonal |
| Projector distance | 1.5 times screen width |
| Electronics | |
| Colour system | Four standard PAL, SECAM, NTSC 4.43, NTSC 3.58 |
| Color memory | Custom brightness, color saturation, hue (NTSC) for each program memory |
| Remote Control | All projection and teletext functions. (Remote control convergence with digital convergence models only) |
| Teletext | Built in teletext with automatic memorization of the 6 pages following the called page in 7 languages |
| On Screen Display | Timed OSD indications both written and graphic of activated functions and adjustments |
| NTSC 4.43 Input | Dedicated program N.26 for NTSC 4.43 (NT2) FBAS input |
| S-VHS Input | Dedicated program N.27 for S-VHS signals greater than 450 lines |
| RGB Input | Dedicated program N.28 for RGB signals with automatic 50Hz / 60Hz switching |
| Composit Input | Dedicated program N.0 (TLC switching for PA1/PA2) for PAL, SECAM and NTSC 3.58 (NT1) FBAS |
| Video Blanking | Adjustable video blanking of the image in all four sides of the TV frame |
| Dynamic Focus | Electronic circuitry to obtain dynamic focusing of the image in the center and edges of the image |
| Audio | |
| Audio Power | 2 X 20 Watts at 8 ohms |
| Audio distortion | 1% at 10 watts of musical capacity |
| Frequency Response | 25Hz to 12000Hz +/- 1dB |
| Tone Correction | +/- 10dB at 30Hz and 10kKz |
Chester River Installation & Current Usage
 In
the house at Chester River the installation was somewhat difficult because we
wanted to use the living room with the water view for the projection room.
This is so that we can sit and watch the water as the sun sets, then just
convert the room into a theater by pressing a button when it gets dark, in fact
even hide the fact that it is a projection room at all!
Checkout the video at the bottom of this page to see
the screen come down and the curtains close ready for the show to begin! As the Seleco projector has a
fixed focal length (it has to be
a distance of 1.5 times the screen width from the screen) and the room has a
cathedral ceiling, the projector ended up sitting in between us like a pet dog
or something! As the good old Seleco was getting on for ten years old at
that point, I decided to start looking for new & smaller alternatives to solve
the problem and these are described here. So the Seleco SVT-180 is now in
store waiting for another suitable
In
the house at Chester River the installation was somewhat difficult because we
wanted to use the living room with the water view for the projection room.
This is so that we can sit and watch the water as the sun sets, then just
convert the room into a theater by pressing a button when it gets dark, in fact
even hide the fact that it is a projection room at all!
Checkout the video at the bottom of this page to see
the screen come down and the curtains close ready for the show to begin! As the Seleco projector has a
fixed focal length (it has to be
a distance of 1.5 times the screen width from the screen) and the room has a
cathedral ceiling, the projector ended up sitting in between us like a pet dog
or something! As the good old Seleco was getting on for ten years old at
that point, I decided to start looking for new & smaller alternatives to solve
the problem and these are described here. So the Seleco SVT-180 is now in
store waiting for another suitable installation to come along or as a standby projector in case the Sharp XV-Z9000U
fails. I can tell you this: If you want to see peoples eye's pop out at
the sight of your equipment, then a big three tube front projector is what you
need! Not only that, but at 850 lumens with drop dead contrast and over
1000 lines of RGB resolution, it makes you realize that the latest DLP
projectors are really not that hot after all, not to mention the fact that I
have been watching this thing for over 10 years now. The best thing of all
though is of course that it is full screen 4:3 and the picture can go from floor
to ceiling with none of that short screen 16:9 crap! If you ever get the
chance to try one of these I recommend it!
installation to come along or as a standby projector in case the Sharp XV-Z9000U
fails. I can tell you this: If you want to see peoples eye's pop out at
the sight of your equipment, then a big three tube front projector is what you
need! Not only that, but at 850 lumens with drop dead contrast and over
1000 lines of RGB resolution, it makes you realize that the latest DLP
projectors are really not that hot after all, not to mention the fact that I
have been watching this thing for over 10 years now. The best thing of all
though is of course that it is full screen 4:3 and the picture can go from floor
to ceiling with none of that short screen 16:9 crap! If you ever get the
chance to try one of these I recommend it!
Pictures
 |
|
 |
 |
 |
 |
 |
 |
Please give the video time to load! If you see black, it means it is still downloading!